
Hi friends, this is my first post and as I ve promised I am going to teach you how to make the logo of Design Club, so here I go.
I believe a good design should be always simple, precise, clean and straight to the point. Personally, I feel that using a few basic, simple shapes and colours is the best way to reach your audience and convey the right message - because you are trying to say something without artifice or special effects. When it comes to a logo, it should be an appetizer, not the whole buffet! Our logo is not an exception. It has just one kind of shape. A Circle, that’s it! So, if you have ever opened MS Paint and drawn a circle, you are equally capable of doing it. So let’s start.
Step 1
First, we need to create a new document in Photoshop. (File>New) Alternately, you may even press Ctrl+N. I am using 1280x800 px, 96dpi, RGB 8bit, white background. I wish to use it as my desktop wallpaper that’s why I have used 1280x800. You may go ahead and use the screen resolution of your own comp. Once you are done filling in the parameters, go ahead and click ‘Ok’. A new blank document opens in the work area.

Step 2
Next, we select the Elliptical Marquee tool and draw a perfect circle. Perfect circle can be drawn by pressing and holding shift, just like in MS Paint. (Please note that instead of Elliptical Marquee, the Rectangular Marquee tool may be present by default. Click and hold on the Marquee tool icon to select the Elliptical Marquee tool. Check out the screenshot).

Step 3
Click on the colour swatch at the bottom of the left tools panel and select a dark shade of red (#7f030b). You may directly type in the hex code of the colour (without the #) which is used in the logo.

Step 4
Click on the ‘Create new layer’ button on the layer palette at the right (If layer palette is not visible by default press F7) and fill in the red colour using the Paint Bucket tool. (Please note that instead of the Paint Bucket Tool, the Gradient tool may be present by default. Click and hold on the tool icon to select the Paint Bucket Tool. Check out the screenshot). The circle which you have made using the Marquee tool is just a demarcation which decides the area where the colour will be filled. The same Marquee tool can be used to select any area / shape etc in Photoshop. The selected thing can then be filled with colour, deleted, cut, copied etc.


Step 5
Now, we just need to make some concentric rings and we are done. The easiest way to make a ring is to make two concentric circles of two different sizes in two different layers and delete the region of the smaller circle from the bigger one. To create concentric circles just duplicate the layer in which the red circle is present by pressing Ctrl+J. When you duplicate the layer, it won’t be visible in the work area because both the circles will be exactly same and they will be in the same position. You may change the colour of the duplicate circle to differentiate it from the original. I ll go ahead and make it black.
Go to the Duplicate Layer on the layer palette. Press and hold Ctrl and click on the layer on the layer palette. This will make a selection around the circle, a similar one which you have made using the Elliptical Marquee tool. Now fill it with black. Now we will reduce the size of the black circle. Press Ctrl+T and you will be able to resize the circle just as you do it in MS Word. To keep it concentric press and hold Shift+Alt. Once you are done with the resizing, go ahead and press Enter.

Now, we again press and hold Ctrl and click on the layer of the small black circle on the layer palette. This will again make a selection around the circle. Now, click on the layer of the red circle on the layer palette. When the selection is still active, press delete. This will remove the area of the small black circle from the big red circle. Now, you can completely delete the layer of the black circle and you are left out with a red ring.
Step 6
Similarly create another ring and place both them like the way they are placed in the logo. So now the layer palette has 3 layers. The red circle, Ring 1 and Ring 2.

Step 7
Now we just have to reduce the opacities of the individual layers. Set the opacity of the layer of the red circle to 70%. Ring 1 to 50% and Ring 2 to 20%.

Step 8
Now select all the three layers in the layer palette by pressing Ctrl, just as you select multiple icons in Windows. Once selected, press Ctrl+G to group the 3 layers. (Grouping is not mandatory; it is just for better organization. It is similar to creating a folder in Windows) Now 'group 1' has the red elements. Similarly create 3 more groups for the Blue, Green and Yellow circles. You may re-size a group by pressing Ctrl+T. You may use #538ba5 for blue, #90bd52 for green and #ecbd0f for yellow.
 |
| Selecting the 3 layers |
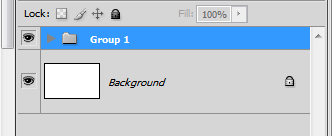 |
| Grouped Layers |
Step 9
After creating all the 4 groups, place them in their proper positions.

Step 10
Go to Windows>Character to make the Character panel visible. Type in ‘design’ with Century Gothic font, bold, and (-75) character spacing. The font size depends on how big the circles which you have made are. I have used Ctrl+T to resize the text layer to best fit into the logo. Similarly, type ‘club’ with Century Gothic font, bold, and (-50) character spacing and align the two words so that ‘i’ in 'design' lies in the same vertical line with the ‘l’ of 'club'. Now we will make some minor changes to the words so that they become unique.
Please note that a text layer is not directly editable because it in the vector mode. We need to convert it to the raster (pixel) mode. To do this we select the text layers, right click on them and select ‘Rasterize type’.


Step 11
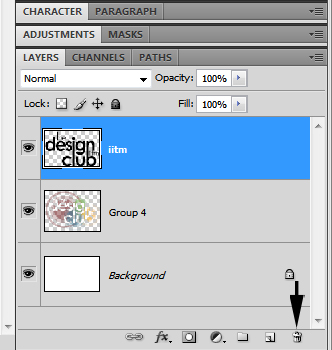
Next, select the ‘l’ of ‘club’ using the Rectangular Marquee tool and delete it. Now, we select a small part of the ‘i’ of ‘design’ using the Rectangular Marquee tool, press Ctrl+T and extend the ‘i’ to form the ‘l’ of ‘club’. Similarly, extend the ‘b’ of club to merge with the ‘n’ of design. Now select the layers, design and club, in the layer palette and press Ctrl+E to merge them. Now type ‘the’ and ‘iitm’ and place them in appropriate places. Rasterize ‘the’ and extend the ‘t’ and ‘h’ of ‘the’ beyond the red circle. Now merge all the 3 layers again by pressing Ctrl+E.


Step 12
Next, Select the four groups, Groups 1 – 4, and press Ctrl+E to merge them. So, now you are left out with just 2 layers in your palette, the layer with the text and the layer with the circles.

Step 13
Now, press and hold Ctrl and click on the text layer in the layer palette to make a selection around the text. Now while the selection is active, go to the circles layer and press delete!

Now, go to the text layer and completely delete the whole layer by clicking on the delete button and Tada... you have successfully made the logo!
Step 14
Now let’s give it a wallpaper look by applying a subtle gray gradient in the background. Resize your logo and place it in the centre of the wallpaper (or any other area of your choice). Select white as the foreground and any light gray as the background colour. I have used # dbdbdb. Select the gradient tool and select the radial gradient mode. Now create a new layer below the logo layer. With the gradient tool selected, click on the centre of the wallpaper and drag it to any one of the corners to fill in the new layer with the radial gradient.

If you feel the logo is looking very pale just duplicate the logo layer by pressing Ctrl+J and set the blending mode of the new layer to ‘Multiply’. This will brighten it up.

Once you follow all these steps, you should get something similar to the image below. This concludes our tutorial. I advise you to experiment with this logo by applying your own touch of style to it, and make sure you show off your work in our Facebook page http://www.facebook.com/DesignClubIITM. I hope that you've learnt something new from my tutorial, feel free to email us on designclubiitm@gmail.com.


Great post! Thanks you so much for the share. It is indeed a helpful one...........Scorpio branding is leading graphic design company.we specializing one stop solution for graphic design chennai and graphic design bhubaneswar.Our objective is all the time to provide inventive Design solutions that match your expertise wants and budget.Together we are going to work by means of the options for one of the best results.
ReplyDeleteGraphic Design Chennai
very interesting and useful content....Thanks for sharing
ReplyDeleteNice Post ! Design your Company Logo, Business Logo with The Logo Crew, leading UK based Logo Design Company.
ReplyDeleteThanks for the share.We are a graphic design company in Bangalore that specializes in logo and website design. If anyone is looking for a company that offers brochure designing,logo design in Bangalore, Jain Technosoft is the key!
ReplyDeleteGraphic Design Company|Web Designing Company
The website is looking bit flashy and it catches the visitors eyes. Design is pretty simple and a good user friendly interface.
ReplyDeleteSEO services pakistan
Its the best information for me..am got the best information in your post..thank you for sharing the best information....Website Designing Services in Bangalore | Website Development Services in Bangalore
ReplyDeleteGreat post I wo d like to thank you for the efforts you have made in writing this interesting and knowledgeable article.
ReplyDeleteSEO services pakistan
Thank you for sharing this amazing post. step by step information is very helpful. great woek done. keep updating. professional web design utah
ReplyDeleteWell, this is real what i'm looking for at this moment. Thanks!
ReplyDeleteCustom Logo Design Service
Nice blog About Graphic Design and nice Experienced with You....Thankyou very much.... Cheap Logo Design Company
ReplyDeleteThank you for this amazing post.ERP software solutions chennai | ERP in chennai | ERP providers chennai
ReplyDeleteNo words to say, Fantastic !!!
ReplyDeletelogo design service
nice posts
ReplyDeleteBrochure Designers in Chennai
Thank you so much for the informative article share with us logo design services in delhi ncr.
ReplyDeleteYour information related to SEO is really very useful for freshers....Thanks for sharing this informative blog..Keep posting
ReplyDeleteWeb Design Bangalore | Website Design Bangalore
thanks for submitting this valuable information with us you can check it also
ReplyDeleteDiploma course list
top engineering colleges in delhi
or visit us top colleges
Thanks for share your topic and get more information topic to be discuss your page For more details:Matrimony in trichy, Vishwakarma Matrimony,Naidu Matrimony,Kongu Vellala Gounder Matrimony.
ReplyDeleteNice post!!! Thank you for sharing with us. very informative and useful, keep blogging like this. SEO is very important for website ranking.
ReplyDeleteOnline Marketing Services in bangalore
SEO Specialist in Bangalore
SEO Agency Bangalore
Hi,
ReplyDeleteThanks for sharing a very interesting article about Learn to make our logo. This is very useful information for online blog review readers. Keep it up such a nice posting like this.
From,
Maestro Infotech,
Web Design Company Bangalore
Thanks for sharing the amazing post. Keep sharing.
ReplyDeleteweb design company in bangalore
web development company in bangalore
digital marketing company in bangalore
Nice post Really useful information Website Development Companies in Bangalore, Web Design Companies in Bangalore, Web Design companies Bangalore, Web Designers in Bangalore, Website Design Services in Bangalore Website Designers Bangalore
ReplyDeleteAmazing post,thanks for sharing this information with us i got more knowledge from article
ReplyDeletewe are the Top Web Development Company in Bangalore
I used the tips to design a logo for a solar company in Perth Frittssolar. The steps were very easy to learn. That helped me make sure the design unique as well as attractive.
ReplyDeleteYour car could be stolen if you don't keep this in mind!
ReplyDeleteImagine that your car was taken! When you visit the police, they inquire about a specific "VIN lookup"
A VIN decoder is what?
Similar to a passport, the "VIN decoder" allows you to find out the date of the car's birth and the identity of its "parent" (manufacturing facility). You can also find out:
1.Type of engine
2.Model of a vehicle
3.The DMV and the limitations it imposes
4.Number of drivers in this vehicle
You will be able to locate the car, and keeping in mind the code ensures your safety. The code can be checked in the database online. The VIN is situated on various parts of the car to make it harder for thieves to steal, such as the first person's seat on the floor, the frame (often in trucks and SUVs), the spar, and other areas.
What happens if the VIN is harmed on purpose?
There are numerous circumstances that can result in VIN damage, but failing to have one will have unpleasant repercussions because it is illegal to intentionally harm a VIN in order to avoid going to jail or the police. You could receive a fine of up to 80,000 rubles or spend two years in prison. You might be stopped by an instructor on the road.
Conclusion.
The VIN decoder may help to save your car from theft. But where can you check the car reality? This is why we exist– VIN decoders!
goruntulu show
ReplyDeleteücretli
54ERM
Recoolhair Provide 100% Curly Lace Front Wigs, Highlighted Wigs, Frontal Lace Wigs, Glueless Wigs, Short Bob Wigs, Colored Wigs, Pre Bleached Knots Wig, Air Cap Wig, Loose Deep Wave Wigs, Glueless Lace Wig, Hair Bundles with Closure. Free Shipping.
ReplyDelete